Wednesday, January 30, 2013

Makin' A Sp"lash": A Beginner's Guide to Using Mascara

     There are plenty of formulas and techniques out there, but below I'll give you a basic step-by-step guide of how I do my lashes.  Don't let the number of steps intimidate you; over time, it becomes second nature and only takes minutes to do.  If this is unfamiliar to you, start off slow to get a feel for it- practice makes perfect!  These are techniques I've picked up from over 15 years ago and counting, so like any art form, there are always new things to learn!


Before                                         After


     For this tutorial, I used Maybelline Mega Plush Volum' Express in Blackest Black.  This formula is a little wet, and while I don't normally like wet formulas, I really like how you can build up your mascara after allowing each application to dry a bit with this one.  Once dry, the product feels rather lightweight, too, which is a plus.  Without further ado, let's get to it!


     Bonus tip: NEVER pump your mascara wand; it only pushes air into the container, allowing for bacteria to grow and product to dry up. Just simply open the wand, and dip it into and out of the tube as needed.

     If you're comfortable with an eyelash curler, you can use one to start off and set a nice shape to your lashes. Close your eyes and clamp the curler to the base of your lashes. Slowly release by pulsing the curler open and close, moving away from the lashes. I usually like to do this twice on each eye. Bonus tip: Warm a metal eyelash curler with a hair dryer for a few seconds to give it a little heat to seal in the curl. Be careful not to burn your skin!


     Begin with the mascara wand at the base of your lashes.  Move the wand upward in a zigzag motion and repeat, covering all parts of your lashes.  This will help create volume.


    Next, with the mascara wand, sweep downward and outward to touch on outer lashes.  Repeat above steps as many times as desired.  I personally like to repeat the above steps a few times, alternating on each eye while the formula is still wet, and then wait a few minutes for lashes to dry.

After first application.

     Allow coats to dry completely. Don't worry about any excess mascara on the eyelid area for now. (If it really bothers you, place a business card behind your lashes and rest it against your head as you apply the mascara.  The excess product will go on the paper instead of onto your skin).


     Once the base of your lashes are defined, focus on the upper half of the lashes, and apply mascara only to that area.  This will help boost length.

    Again, repeat this step as many times as desired, allowing for coats to dry.


After mascara has been applied to lash tips.


     You may continue to build up more and more layers until desired volume and length is achieved.  If you have clumps, use a mascara comb to separate lashes.  Add a thin layer of mascara to bottom lashes for effect.  Use a cotton swab to gently remove any mascara residue from the eyelids.
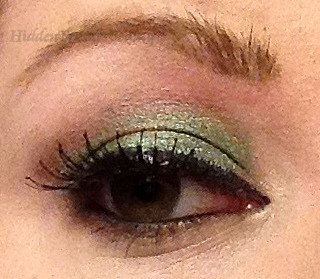

Final 

.

     Bonus tip: Applying eyeliner makes lashes appear bolder and more dramatic.


     Voila!

     Keep in mind, different formulas behave differently (wet vs. dry consistencies, different wand shape, volume, length, or lash defining), and you will find over time that you may have a preference to one over the other. In the mean time, enjoy playing around with it as you discover what you are able to do!

Read More

Friday, January 25, 2013

Get It Before It's Thrown Into The Incinerator! Shiro Cosmetics' Discontinued Science Collection Sale


     Even though The Science Collection has been out for a few years, it is now being discontinued with the remainder being sold for 20% off its original price. Based off the original video game Portal, I knew I had to buy some of these shadows!  I have only recently started playing this highly popular game in the past few months, and it’s amazing.  Owning a part of a collection associated with it containing gorgeous, quality colors is a glam nerd’s dream come true.  Every color has a clever name associated with quotes from the game.

     What I love about the shadows from Shiro is how easily the pigments blend onto the eye area without having to pack a lot of product on. The jars always arrive jam-packed with product, too, whether it be full-sized or a larger sized sample jar.


 Check out the Shiro Aperture lid, and how much product is packed into the jar (this was after a few uses, too!)

Without Flash- The pigments I purchased (from left to right) were Because We Can, Party Escort, Beta, and You Were Adopted. Used with I-Candy Eye Primer.


  With flash- The pigments I purchased ( from left to right) were Because We Can, Party Escort, Beta, and You Were Adopted. Used with I-Candy Eye Primer.


     According to Shiro Cosmetics, each pigment is described as such:

     Because We Can- “Super-bright shimmery hot pink with flashes of silver. Lip-safe!”

She wasn’t kidding when she said this is “super-bright.” It’s a gorgeous, girly pink that also makes a great lip/blush color.

     Party Escort- “Shimmery blackened silver with lots of red sparks. Lip-safe!”

I found that this color actually requires a little more building up to achieve as much drama as the other colors. It looks GREAT directly on top of the other colors!

     Beta- “Shimmery blackened emerald. Not lip-safe”

Another gorgeous shade of green. Blends really nicely with You Were Adopted.

    You Were Adopted- “Dark shimmery grey-blue with flashes of silver and green. Not lip-safe.”
Wowzers, is this a bold color!  It really stands out if you want a heavier pigment.


Because We Can on Lid Paired With Party Escort Over Crease, Lower Brow Bone and Outer "V"- Going For That Basic Companion Cube Look

You Were Adopted on the lid, Blended in With Beta on the Crease and Outer "V."

     I’d like to try out some of the other colors as well, but I’m not sure how much longer these shades will be up for grabs.

     Be sure to snag The Science Collection while it’s “Still Alive.” ;)

     You can find the link to view the whole collection here.


Read More

Tuesday, January 22, 2013

Tarte BB Tinted Treatment Primer Review/Video Tutorial


     The arrival of BB creams (also known as Beauty Balms) in the U.S. made waves this summer, particularly through drugstore brands such as Loreal, Maybelline, and Garnier.  As the hunt for the ideal BB cream went underway, higher end companies started formulating their own versions.  I thought I had given up on BB creams altogether until QVC launched Tarte's BB Tinted Treatment Primer in August 2012. The on-air demonstrations looked promising, and when I tried the product for the first time, I was not disappointed.  


     It's important to note that Tarte does NOT use fragrances or mineral oil in this product.  Some companies use these as selling points, though even subtle fragrances and some mineral agents  can actually cause irritation to the skin and be counterproductive to the original purpose of the product.  


Check out the tutorial below on how to use this product:


     When selecting a shade ideal for your skin color, try to find one that will match under your wrist. As you can see from the photos below, the product initially appears darker, but is nearly undetectable once blended in.  Stores like Sephora and Ulta often have a sample on display for most of their higher end products so that you may test it out first.  This allows you to try several different shades if you would like before committing to purchasing.  This also gives you an initial feel for the product, how it applies to the skin, feels on you, and tests its lasting power if you're not planning on purchasing a particular product right away.


Prior to blending.

Once blended in (flash was used to enhance any trace of product).


    Pros: Silky smooth formula, buildable product, covers redness, produces an overall healthy, smooth finish, long staying power


    Cons: tends to enhance highly dry areas, may cause minor irritation to sensitive skin


     Tarte BB Tinted Treatment Primer can currently be found at UltaSephora, and Tarte's website for $34 in Fair, Light, Medium, and Tan.  (The original formula started at Light). Their relaunch has added SPF 30, which is ideal for protecting skin from every day sun damage. While this is more expensive than some of the earlier American BB Creams we've seen by other companies in the summer, I personally feel that it is worth the price.  I know that I've spent more in the past on failed products over time that have added up to more than the price of Tarte's BB cream, only leaving my skin itchy, irritated, cakey, or yellow.  
Read More

Saturday, January 19, 2013

Glamourdoll Eyes January OTM

     Each month, Vee of Glamourdoll Eyes releases its OTM (Of The Month). These sell like hotcakes and often require being placed on an e-mail list for notification of when these babies go on sale each month.  What makes them so great? Aside from the company's reputation of selling affordable, high-quality pigments, most OTM's come with bonus items and the color is always a surprise.

    This year's OTM program was kicked off with Flourishing, which, according to the company,  can be described as "A dark green with light green and almost brown duochrome.  Safe  for: Eyes. Nails. Face."


      Emerald green is Pantone's go-to color for 2013, so be prepared to be seeing it a lot this year!  I'm personally a huge fan of duochrome pigments for their reflective, multi-color properties.  In addition to the eye product, it arrived in a lovely emerald green pull string bag filled with a large chocolate coin and a package of  green Sixlets candy (stroll down memory lane, anybody?) Other months have larger bonuses, such as falsh eyelashes, lipgloss, or even extra pigments!  


Swatched with no flash. Left- Using GDE's Control Freak and Foil Me, Center- Using GDE's Control Freak, Right- Applied directly onto skin.


Swatched with  flash. Left- Using GDE's Control Freak and Foil Me, Center- Using GDE's Control Freak, Right- Applied directly onto skin.


     Flourishing can be used for a subtle look to really make eyes pop, or built up for a more dramatic look. This color is perfect paired with a brown shade and a neutral lip for an organic look, or with gold shimmer and red lips for a holiday creation. 


Without Flash, Paired With GDE's Bittersweet, Control Freak Primer, and Foil Me Solution


Without Flash, Paired With GDE's Bittersweet, Control Freak Primer, and Foil Me Solution


With Flash, Paired With GDE's Bittersweet, Control Freak Primer, and Foil Me Solution


     To sign up for the e-mail notification list for GlamourDoll Eyes' OTM program, or to learn more about it,  check out Glamourdoll's OTM page.
Vee usually sends out an e-mail within the first week of each month.  She likes to give a heads-up on  The Official Glamourdoll Eyes Page.

     The year started off in subscriptions of 1, 2, 3, 6, and 12 month increments.  Regardless of what you choose, you save money through the monthly program and also receive the bonus products!


Note: I was NOT paid to endorse these products. I paid for them out of pocket.
Read More
Powered by Blogger.

© 2011 Hidden Treasures Beauty, AllRightsReserved.

Designed by ScreenWritersArena