Wednesday, April 24, 2013

GDE April OTM: Ladies Love "Fellas Love Yella!"

     I am finally able to share photos of the OTM!  My computer is pretty sick and on its last life, so I had to play around a bit with my photo card to finally get it to work. Thanks for the patience! :) On that note:


     This April's OTM arrived in a bag with a  beautiful golden foil damask design! I'm a huge fan of damask patterns, so it was lovely to see.


     The bag opened to reveal delicious Lemonheads (appropriate to the color), pigment, and description card with additional business cards.


The pigment itself is called Fellas Love Yella:


     Glamour Doll Eyes describes Fellas Love Yella as "A pale yellow marigold yellow with golden/copper shimmer.  Safe for eyes, lips, nails, face."  It reminds me very much of the Maybelline Color Tattoo 24 Hour Cream Gel Shadow in Bold Gold, with more of a yellow pop to it. I think this would serve as a great top color to wear over the gel shadow, or in its own glory with primer, since I tend to have major creasing problems with the Color Tattoos.


     Swatched indoors without flash:
Left- With Control Freak and Foil Me
Center- With Control Freak
Right- applied alone

     Swatched indoors with flash:
Left- With Control Freak and Foil Me
Center- With Control Freak
Right- applied alone


     For the following look, I applied Ahoy Sailor all into the lid and crease, Premonition on outer crease, and Skin of a Killer in the brow bone and inner corner of the eye. Then I brushed Fellas Love Yella on the top of my lid and lined it in the inner rim of my bottom lashes for that burst of color!


Read More

Monday, April 8, 2013

Sandy Beaches- EOTD featuring Glamour Doll Eyes

FTC Notice: All items were purchased out of pocket.    


      Hi everyone! First off, I would really like to thank everyone who visits and checks on my page- I appreciate it more than you know. My schedule is a little strange for now since I recently started a new job, but I have several future ideas set and would like to implement an e-mail notification list and Facebook page in the near future.


With flash.


     For this look, I patted a little Glamour Doll Eyes Control Freak primer all over the eye area.  Next, I brushed Mannequin onto the lid.  It's a beautiful sheer neutral that has a gorgeous sheen in the light.  Using Peep Show from the Easter 2013 Collection, I brushed all along the crease, above the lid. It's a pretty, pale matte blue shade.  To give a nice pop, I brushed Celestial Crow into the outer half of the crease and outer "v."  It is a highly-pigmented, super shimmery blue with loads of glitter in it. Next, I applied Skin of a Killer onto the brow bone and inner corner. To finish off the eye, I used my finger to dab a little Hippity Hop from the Easter 2013 Collection onto the center of the lid. It was a mystery color being sold, and is a matte sea foam green. It puts just a slight variation of texture and color on the neutral lid.


With flash.


     For the lips, I applied the Shiro Cosmetics' Ridiculously Photogenic Intertube on as a base, and topped Triple Dog Dare on top for added shine.


Products Used:

     Face:
Tarte Amazonian Clay 12-Hour Full Coverage Foundation in Light
Hard Candy Glamoflauge Heavy Duty Concealer in Light
Revlon Photoready Sculpting Blush Palette in Peach


    Eyes: 
Glamour Doll Eyes Control Freak primer 
Glamour Doll Eyes pigment in Mannequin (Halo Collection)
Glamour Doll Eyes pigment in Peep Show (Easter 2013 Collection)
Glamour Doll Eyes pigment in Celestial Crow
Glamour Doll Eyes pigment in Skin of a Killer (Twi-Shadows, discontinued)
Glamour Doll Eyes pigment in Hippity Hop  (Easter 2013 Collection, mystery color)

Milani Easyliner Retractable Liner in Black (lower lash line)
Sally Girl Mini Liquid Eyeliner in Black
L' Oreal Voluminous False Fiber Lashes Mascara in Black Lacquer
Milani Brow Fix Eye Powder Kit in Medium


    Lips:
Shiro Cosmetics Intertube in Ridiculously Photogenic
Shiro Cosmetics Holiday Gloss in Triple Dog Dare (Christmas 2012)


Read More

Saturday, March 23, 2013

Simply Irrestistable: Smashbox Love Me Eyeshadow Palette (Image- Heavy)

FTC Notice: These items were received from the company in a giveaway.

     Earlier this year, Smashbox was running a sweepstakes in which they were giving away sets including one of their Love Me products and one of their top-selling products to several entrants.  I was very fortunate to be one of the winners, and within 2 weeks of notification, a box with Smashbox's Love Me Eyeshadow Palette in Entice Me and travel-sized Full Exposure Mascara in Jet Black arrived in the mail.

I love the sticker on the packaging!


My kitty was excited, too! :)

     The Love Me Eyeshadow Palette in Entice Me features five shimmery and sparkly neutrals, including sparkling purple, purple taupe, icy pink, icy blue, and deep sparkling navy (color descriptions courtesy of Smashbox's website).  The compact itself contains artist Curtis Hulig's iconic "Love Me" heart design, which is featured throughout the entire Smashbox Love Me series.


Without flash.


With flash.


         ...but there's more to this shadow than meets the eye.


     The "Love Me" logo flips up, further revealing the colors!


Without flash.

With flash.

     The colors are highly pigmented and are incredibly soft and smooth to the touch.  This made application a BREEZE!  I did not use any brushes- simply my fingers for application and blending. I used all the colors in the palette and they went together so nicely. The only disappointment I have is with the sky blue shade- for some reason, it did not want to stay put at all. It was the second color I applied to my lid, and then I reapplied it onto my lid last because it was no longer detectable. It still did not want to stay put after that. I had no problems, however, with the other colors. The next time I use this palette, I plan on using a mixing medium and different base just to see if I'll get a different result.  If you do plan on purchasing a Love Me Eyeshadow, check out the back of the box. There's a peel-off sticker that includes a how-to guide for achieving a look incorporating all the colors. It is a bit discrete, and I did not notice this until after I used the palette for the first time:


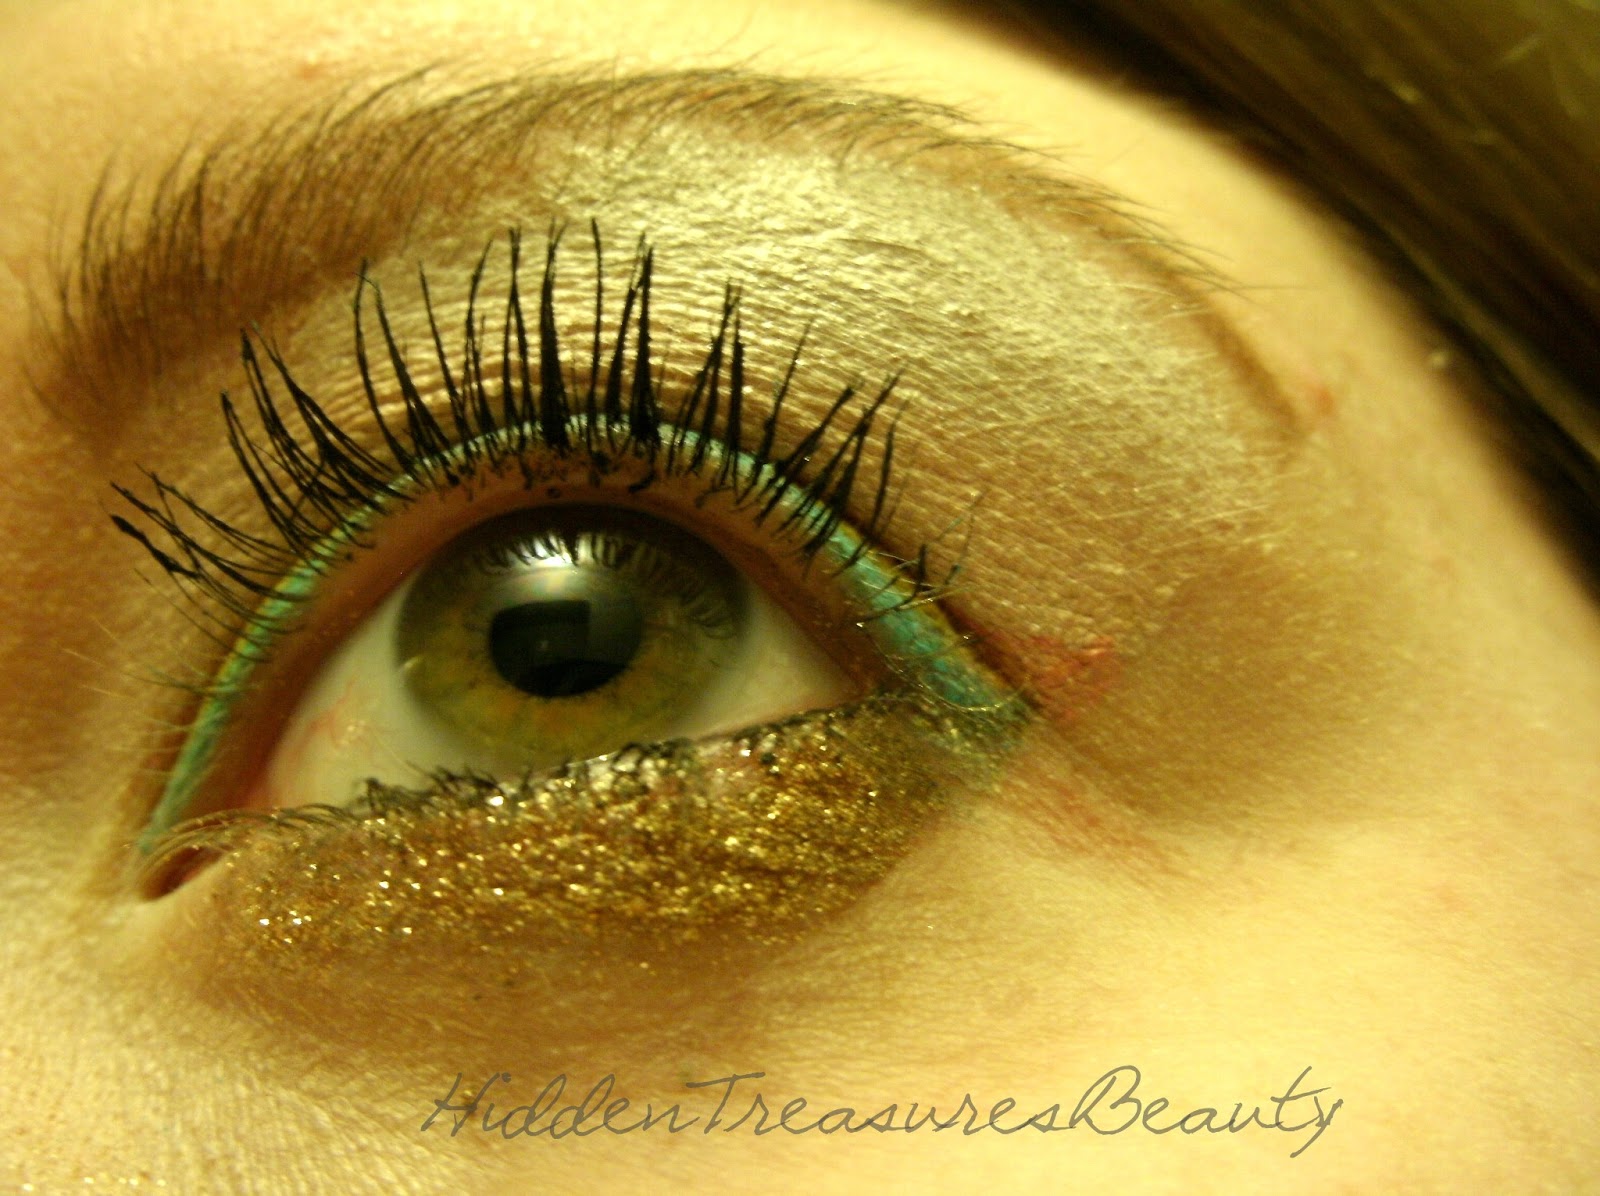
  The Smashbox Full Exposure Mascara is good for achieving nice, polished lashes without going over the top.  The applicator is a bit thicker and larger than the typical brush, with the classic, slightly tapered shape. While I strongly disagree with Smashbox's claims of the product's ability to volumize 104% and lengthen lashes 32%, I can't vouch for how it would work on others since not all lashes are created equal. However, clumping is minimal and this is an ideal mascara to use with false lashes.


     The following are photos incorporating both the Smashbox Love Me Eyeshadow Palette in Entice Me and the mini Smashbox Full Exposure Mascara in Jet Black.


    The lipgloss is Smashbox Lip-Enhancing Mega Gloss True Color in Celebrity and was also from a previous giveaway (just had to answer a quiz on their Facebook page and sign up for it that given day!) for a full-sized tube. If you haven't already, I think it'd be a great idea to "like" them on Facebook just to keep an eye on the giveaways they have! 


    Overall, I was really impressed with the Smashbox's Love Me Eyeshadow. The shadows are much more gorgeous in person, creating such a romantic, feminine look. You can purchase Smashbox's Love Me Eyeshadow Palettes in Entice Me or Admire Me for $34 and .38 oz. of Full Exposure Mascara for $19.50 at Ulta, Sephora, Smashbox.com, or Amazon.

Disclaimer: I was not endorsed by Smashbox to promote this post.  The content expresses my sole, personal opinion without influence from the company.
Read More

Tuesday, March 19, 2013

St. Patrick's Day Look: Pot O' Gold


      Hello Everyone! I know it's a few days late, but I wanted to briefly share the look I did for St. Patrick's Day.  While I usually really look forward for an excuse to wear green shadows every year for this occasion, I chose to steer away from using it this year. Instead, I opted for a "pot of gold at the end of the rainbow" type of theme:


     Please note that for the above photo, I did photoshop a small mascara smudge out of the blue shadow region, but I do not normally do that and would state so if I did. I avoid it at all costs, but  really wanted to best display the look for demonstrative purposes.  


     If you REALLY want to amp it up, add some colored glitter to each color line and add a playful little shamrock to the side of the eye:


     This was my first time trying a triple liner look, which was challenging, but I'm allowing myself a little grace because I know it's not perfect but only gives me space to improve! :) I hope everyone had a safe and fun St. Patty's Day!


Products Used:

NYX Jumbo Pencil in Milk
Urban Decay Sin shadow from the Naked Palette
I-Candy Cosmetics Blue Shadow from the CHAOS Vie En Rose Palette
Glamour Doll Eyes:
    Gruesome (Halloween Collection 2012, Set 1)
    Hayride (November 2012 OTM)
    Greased Lightning
    Steam Punk Eye Lights 
    Mannequin (Halo Collection)
    Laced With Snow (December 2012 OTM)

For the added pop in the final photo:
Claire's Cosmetics Eye Makeup (glittery gel color palette)
Shiro Cosmetics in Beta

Rest of the eye:
NYC Eye Liner Duet in Through The Storm (black side)
Milani Brow Fix Brow Shaping Kit in Medium
L' Oreal Voluminous False Fiber Lashes Mascara in Black
Hard Candy Glamoflauge Heavy Duty Concealer in Light

Read More

Friday, March 15, 2013

Glamour Doll Eyes March OTM- Dreamboat is Peachy Keen!

     The OTM's always leave me guessing, and I was a bit stumped on this one. I automatically wanted to think green would be the monthly color in honor of St. Patrick's Day, but figured it would be out of the question since it was already featured in January.  Vee's hint with the name Dreamboat a few weeks ago only made me think of water- a blue, perhaps?  I sure was proven very wrong, but now have another unique color added to my pigment collection in Dreamboat.

     When I opened the package, I was greeted with one of the satin drawstring bags that every OTM comes in; this one was a soft peach. Honestly, it is by far my favorite bag in terms of color- just so soft and feminine. It kind of reminds me of ballet slippers. 


     I continued to open the bag, and to my surprise, my face appeared on the March OTM card! I literally squealed! 


Photo from my "Vampy Valentine" look!

     Vee had asked for head shots from customers to use for the OTM card, and I honestly did not think I would be selected. Thank you again, Glamour Doll Eyes! You have made me one very happy girl. :) Vee is still looking for faces to put on two months' worth of OTM cards, so if you are interested, visit the Glamour Doll Eye Facebook page for more information.


The contents.


     To match the pastel springy theme, there were also pastel packaged candies included in the bag.  Peach was definitely the theme of the month, because Dreamboat turned out to be a spring-forward color. As described on the OTM card:

"A light peach with green sheen. Safe for eyes, lips, nails, face."


     The pigment appears bright orange-yellow in the jar, but actually has more of an light orange-gold color once applied. I love the fact that is has green hints in it as well, because it works really nicely with green pastels. (See look further down for the color combination).


Without Flash:
Left: With Control Freak and Foil Me
Center: With Control Freak
Right: Dry


With Flash:
Left: With Control Freak and Foil Me
Center: With Control Freak
Right: Dry

     Vee also does bonus months, where she includes additional products in the package. This month, she also added a sample jar of Petticoat, a highlighter from Kiss My Sass Cosmetics. Following the theme, it is another peach color. I found this to be more on the pinky side.  


Without Flash:
Applied dry.


With Flash:
Applied dry.


     Even though it's a highlighter, I applied it along my cheekbones and found that it added a really nice touch of color to my face. It was very natural looking for a healthy glow. 

  The following pictures were taken with a flash. Petticoat was used on the browbone. Dreamboat was applied onto the lid, Mackinac (pronounced Mack-in-NAW) in the outer-v, June Bug in the crease, and Sparkler in the center of the lid and edge of inner lid. Pink Cadillac from the discontinued Eye Lights collection was added to the bottom to further soften the look. All of the GDE colors excluding the OTM and Pink Cadillac are a part of the permanent Blogger Collection. If you are new to Glamour Doll Eyes, I would suggest the Blogger Collection as a great starter set due to its nice variety of colors.


Taken without flash, to show the overall look and slightest touch of color Petticoat adds to the cheeks:


     This month's pigments really challenged me to put aside the darker colors and go softer.  I'm really excited to try out this color with a few other pastels I have, in addition to some other brighter pigments and see how they work with one another! Since it's lip-safe, I also think Dreamboat would look amazing dabbed on top center of another lip color for a little peach punch.


Read More

Monday, March 11, 2013

Update: Super DUPEr- Essence of Beauty Precision Blender Sponge


     So, the Beauty Blender has been a fairly hot item so far this year. It's a reusable, egg-shaped sponge, designed as such to offer a versatile range of makeup application.  The wider end and base is used for overall coverage, while the narrower end is intended to reach crannies of the face. The end result is a fully blended face. While the Beauty Blender runs for a little over $15 or more, I was able to find its sibling for only $4.99 at CVS! Essence of Beauty's is a very similar makeup tool, and while much more affordable, I found it to be highly effective and even more sensible in shape in terms of use.  Did I mention it's infused with Vitamin E?


                                                              Essence of Beauty Precision Blender Sponge


Beauty Blender
Image Courtesy of Sephora.com


     The main sell for me is the highly narrowed tip- I'm able to reach into the tiny crannies around my nose and blend concealer underneath my eyes seamlessly. While I really like the concealer that I'm currently using, it is a bit on the thicker side and the Precision Blender Sponge has drastically reduced any unfinished appearance.  It is the only thing I'm going to be using to blend my concealer from now on.

     While the larger base on the other end is recommended for overall foundation application, I much prefer to just use my fingers or a brush since I do like to use more product and I feel the sponge sucks up to much of the product. It took me a few tries to get this correctly, but I ended up really liking the finish and using less foundation than I normally do using my fingers. The trick is to get the sponge wet enough, and squeeze excess water out. For this type of application, what I've found to work best it to hold the sponge by the grooves and completely disregard the rest of the blender- i.e. pretend that you are working with a tiny circular sponge. I found that I had much more control this way.

     If you're looking for a nice, inexpensive blending tool, or would like to test out this unique product before committing to spending a little more money, consider giving Essence of Beauty Precision Blender Sponge a whirl.

Read More
Powered by Blogger.

© 2011 Hidden Treasures Beauty, AllRightsReserved.

Designed by ScreenWritersArena